


Creating a bright and nurturing environment that brings fresh sprouts to your home can be easier than expected. Perennials, annuals, and even warm-season seedlings can spring up indoors under the right conditions. All it takes is preparation (and a little extra love and care, too). Whether you’re looking to hone your green thumb in the off-season, just taking up gardening, or you're looking for something to do with the whole family, keep reading to learn how you can start seeds without unnecessary planting equipment required. Grab your gloves to get started!

Gather Your Materials
First, you’ll need to gather all your materials. Having these on hand and ready to go will make your planting process smoother and help the roots of your seedlings take hold. You’ll need:
1. Plastic Greenhouse (optional): Having a small greenhouse indoors or outdoors will protect from harmful UV rays, help regulate temperature from the changing seasons, and provide a dedicated space to grow your seeds. Greenhouses can have shelves to nicely stack your seeds while they take root and most have zippered doors to keep out pets from knocking your seeds over. While this item is optional, we highly recommend keeping your growing seeds all in one place. You can buy horticulture bubble wrap to insulate the greenhouse further in the winter if desired. Read our blog 3 Reasons Why Plants and Flowers Grow Faster and Healthier Inside a Greenhouse to learn more.

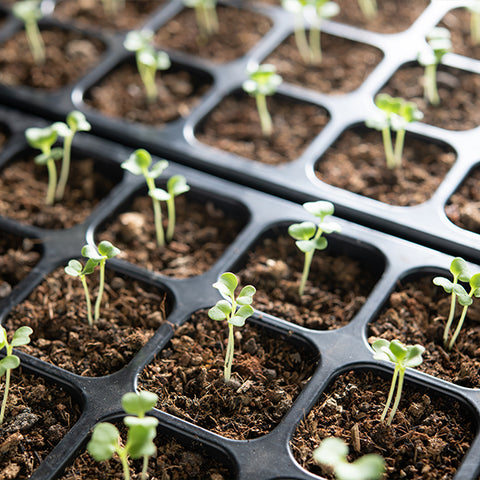
2. Grow Bags or Seedling Trays: These are the materials you will be placing your seeds and soil in. The grow bags can host multiple seeds when spaced properly apart. Both are temporary options before transplanting your sprouted seedling. You can easily upcycle any recyclables you have as well! Read our blog titled, How to Plant Delicious Vegetables in a Grow Bag to help get started.
3. Grow Bag or Tray Cover/Bottom: To keep over-watering drips from making a mess, having a bottom tray underneath your plants will save you time and energy. The covers keep the plants insulated a bit more if that is necessary for your seedlings.
4. Seeds: Of course! Any kind of seed you’d like to plant can get their growth started in your indoor garden. We recommend starting perennials (spinach, kale, etc.) in January-February, annuals (cosmos, marigolds, etc.) in March, and warm-season seeds (eggplants, tomatoes, etc.) in April in order for them to germinate properly and be ready when the time comes to transplant them outdoors.
5. Potting Soil: You can directly buy potting mix specifically for starting seeds. This mix will have extra nutrients, isn’t too dense, and is fine-grained. This allows the seedling’s roots to take hold easier. When transplanting them after your seedlings have sprouted, you’ll want a generic potting soil to plant them in pots, garden beds, or in the ground for an easier transition.
6. Watering Can/Spray Bottle: Keeping your seeds moist is essential for proper growth of your seeds. The spray bottle can be a fun (and functional) way to keep them wet without over-watering them.
7. South-Facing Window (optional): Not necessarily something you can go and buy, this item is recommended for the best growth from your seeds. The window will provide light and your home the warmth necessary to get green buds to spring open.

Go Step-By-Step
1. Find the Right Spot: make sure to set up your seedling planters in an area that gets plenty of sun, isn’t going to be disturbed, and will be spacious enough to track everything you need. Indoors, it’s best to find a south-facing window. Again, we recommend getting a plastic greenhouse to keep them covered, all in the same place, and easy to tend to. If not, make sure to cover them when necessary.
2. Fill Your Trays or Bags with Potting Soil: Grab your seed starting mix. It will be light and fluffy. When you put the mix into your seedling pots, you want it to be damp. To get that texture, pour your mix into a large bowl and add water to mix. Keep adding water and stay patient! Soon, your mix will be ready to go in. Fill the planter up to the top.
3. Sow Your Seeds: Place 3-4 seeds per seedling planter. Gently push them down so that they are under the surface about 2 centimeters. This will make sure that they are protected and will absorb the right nutrients. If your seeds are especially small, leave them uncovered for a better chance at germinating. We recommend labeling all of your sprouts to keep track of which germinate and which don’t (plus, it’s easier to transplant them in your garden in a few months!).


Simply put, gardening doesn’t have to be so complex! When you take the necessary precautions, a garden of sprouts can bloom in your home in no time. Plus, there’s nothing more delicious than vegetables grown by you. Grab your materials and get growing!


